Chromoskedasic DC: Colour Alchemy in the Capital
Part 3 of 3 in the Chromoskedasic Sabattier series | ← Previous: Part 2
The previous two posts laid the foundation: what chromoskedasic printing is, its history and lineage, and the physics and chemistry that enable colour formation from silver nanoparticles. Now we turn to practice. This post documents my experiments applying the technique to photographs from Washington DC—the workflow I developed, the successes and failures, and the lessons extracted from several dozen attempts.
My workflow differs from standard approaches in one significant way: I perform the chromoskedasic treatment outdoors under natural daylight rather than under room light in the darkroom. This emerged from practical necessity—inadequate darkroom ventilation for extended chemical sessions—but proved to offer certain advantages. I'll discuss the reasoning and results throughout.
If you're considering trying chromoskedasic printing, this post provides concrete guidance. I've made enough failed prints to identify reliable patterns, and enough successful ones to understand what the technique can achieve.
Why the DC Metro
The Washington Metro system, designed by architect Harry Weese and constructed between 1969 and 2001, represents one of America's most ambitious public architecture projects of the late twentieth century. The system serves the District of Columbia and surrounding Maryland and Virginia suburbs through 98 stations spanning six lines and over 120 miles of track.
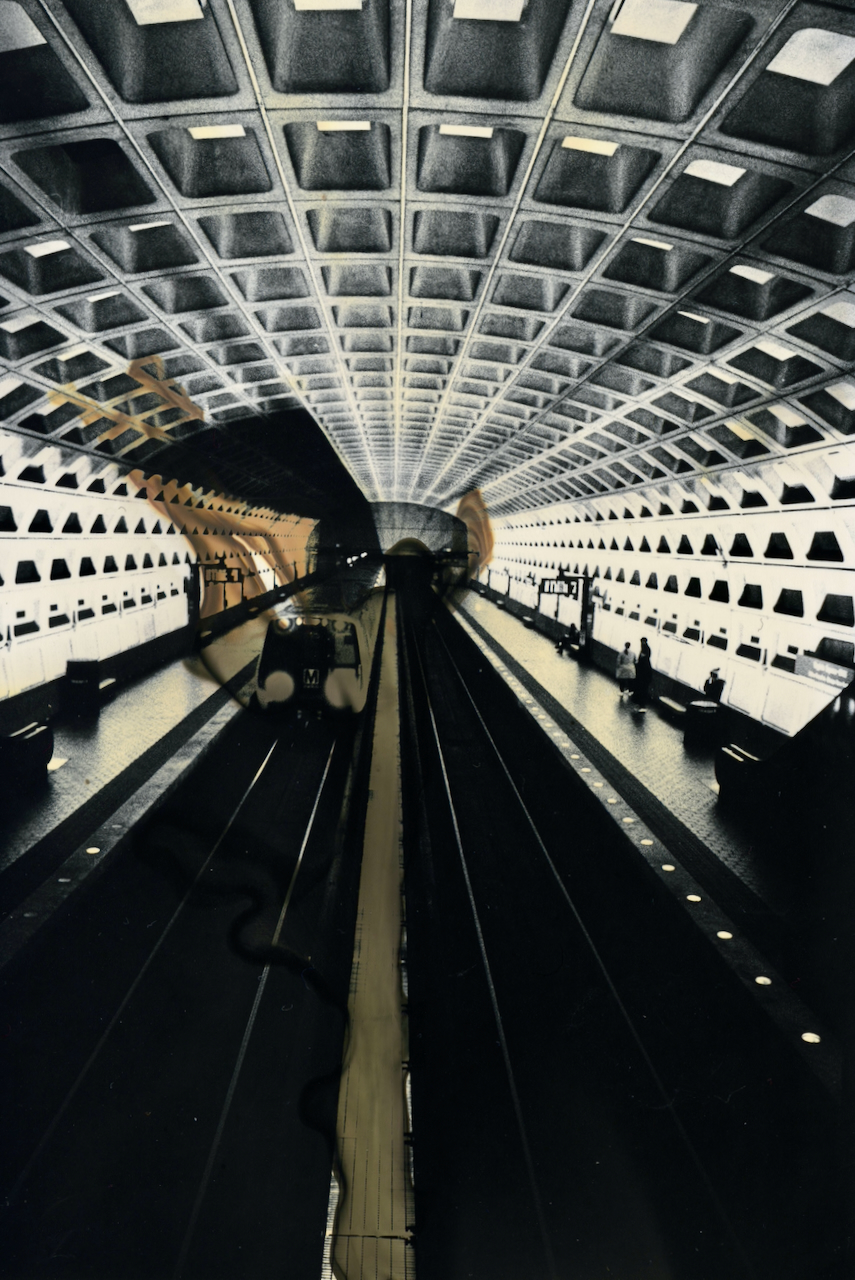
Weese's design established a distinctive visual vocabulary: coffered concrete vaults that widen toward the platforms, indirect lighting casting gradients across curved surfaces, dramatically long escalators connecting platform levels to the surface. The stations draw on brutalist precedents—raw concrete, expressed structure, monumental scale—while achieving an elegance unusual in public infrastructure. The coffered vault design, beyond its aesthetic impact, serves acoustic and structural functions, controlling reverberation while spanning wide platform areas without intermediate supports.
Photographically, Metro stations present high-contrast scenes with clear geometric structure. The controlled lighting creates deep shadows and bright highlights with definite separation rather than continuous gradation. The repeating architectural elements—coffered ceiling panels, escalator handrails, platform edge tiles—provide visual rhythm that survives substantial image transformation.
These characteristics make Metro photographs well-suited for chromoskedasic treatment:
Clear tonal separation: The process transforms highlight areas while leaving shadows largely unchanged. Images with distinct zones of light and dark show effects most dramatically. The Metro's theatrical lighting provides exactly this tonal structure.
Strong geometric armature: Architectural images with clear compositional bones can survive aggressive colour transformation because the structure remains legible even when colour shifts unpredictably. A portrait or landscape with subtle gradations might become muddy; the Metro's geometry remains readable.
Appropriate colour associations: The concrete and artificial lighting of Metro stations produce warm grey-yellow tones in black and white. The amber-bronze palette chromoskedasic chemistry produces feels natural against this subject matter—warm tones that suggest aged metal or late afternoon light rather than arbitrary colour effects.
Tolerance for variation: The repeating ceiling coffers mean that uneven colour development across the print reads as lighting variation rather than processing error. If some panels develop more intensely than others, the eye accepts this as differential illumination.
The Washington Monument and other DC landmarks offered different opportunities: simpler compositions, larger continuous tonal areas, and subjects carrying strong cultural resonance. Processing photographs of the Monument—watching white marble obelisk transform to bronze—felt like performing alchemy on an American icon.
Film Choices and Exposure Strategy
I shot the DC photographs primarily on Kodak Double-X (5222), a cinema film rated at ISO 250, featuring moderate contrast and finer grain than typical camera films of its speed. I develop it in Rodinal at 1:50 dilution. The resulting negatives show tonal gradation with good highlight separation—detail holds well into the high values without blocking. This matters for chromoskedasic printing, where highlight areas receive the most transformation; blocked highlights provide nothing for the chemistry to work with.
For chromoskedasic work, exposure and development strategy differs from conventional printing:
Expose generously for shadows: Shadow regions will remain essentially unchanged by chromoskedasic treatment—they contain dense, fully-developed silver that the chemistry doesn't restructure. Ensure adequate shadow exposure in the negative to preserve detail you want in the final print.
Don't push development: Contrasty negatives with blocked highlights don't serve the process. You want open, detailed highlights that give the chemistry silver to work with. Normal or slightly restrained development is better than extended development.
Consider tonal distribution when framing: Images predominantly middle-grey won't show dramatic effects. Look for scenes with significant highlight area—skies, illuminated ceilings, bright walls—where colour transformation will be visible. The Metro stations, with their dramatic interplay of dark tunnels and lit vault ceilings, naturally produce well-distributed negatives.
My Workflow: Darkroom Preparation, Outdoor Treatment
My chromoskedasic workflow splits between two locations. The darkroom provides controlled conditions for initial print exposure and partial development; outdoors provides ventilation, natural light, and working space for the chemical treatment.
This also offer advantages. Natural daylight, being full-spectrum and intense, may provide more uniform activation than artificial room lighting. The outdoor environment allows extended working sessions without fatigue. And there's something fitting about performing this light-dependent chemistry in actual sunlight.
Step 1: Print Exposure (Darkroom, Safelight)
I work with Ilford Multigrade RC Pearl, and Fomatone 132, typically in 8×10 format. The prints receive enlarger exposure as usual, but targeting slightly lighter than I would for conventional printing—roughly two-thirds to three-quarters stop less exposure than would yield a properly finished conventional print.
The reasoning: chromoskedasic treatment darkens highlights substantially. If you start with correct-looking exposure, you'll finish too dark. Beginning light leaves room for the chemistry to add density while forming colour. The final result should appear properly exposed; the starting point should appear noticeably light.
Step 2: Partial Development (Darkroom, Safelight)
This step requires attention and practice. The print goes into developer—I use Adox Neutol Eco Developer at 1:4—and I watch the image appear.
The goal is to develop until detail is fully visible in highlights but overall density remains light. For a print that would normally develop for 90 seconds to completion, I pull it at roughly 45-60 seconds. Shadows should be establishing but not fully dense. Highlights should show complete detail but remain distinctly lighter than they would in a finished print.
Fixed times are unreliable because development rate varies with temperature, developer freshness, paper batch, and image content. I've learned to read the prints rather than watch the clock. The key indicator: highlight areas should look “fully detailed but not yet finished”—all the tonal information is present, but the overall print appears light.
Underdevelopment risks: If you stop too early, insufficient silver has formed in the highlights. The chromoskedasic chemistry will have limited material to work with, producing weak colour and muddy results.
Overdevelopment risks: If you continue too long, the highlights become too dense and the silver particles too large and interconnected. Colour formation will be compromised because you've already produced conventional-scale silver rather than leaving room for controlled nanoparticle formation.
Step 3: Stop Bath and Initial Rinse (Darkroom, Safelight)
A quick dip in stop bath (30 seconds of agitation) arrests development. Follow with a water rinse (1-2 minutes) to remove surface chemistry.
Critically: do not fix the print. The unexposed silver halide remaining in the emulsion is essential for chromoskedasic colour formation. Fixing would remove this material, eliminating the chemistry's substrate.
Step 4: Transport to Outdoor Working Area
I place the wet, unfixed prints between sheets of black plastic—heavy garbage bags work adequately—and carry them outside. The black plastic prevents premature light exposure during transport while I set up chemistry and working area.
My outdoor setup consists of plastic trays, chemistry in labelled bottles, brushes, and a garden hose for rinsing. A folding table provides working surface. I position to work in full sun or bright shade—consistent, intense illumination.
Step 5: Stabilizer Application (Outdoors, Daylight)
With chemistry prepared and print positioned face-up, I begin treatment under natural daylight.
I apply stabilizer with a wide brush, covering the entire print surface evenly. Within 30-90 seconds, light-struck areas shift from their developed grey toward pale yellow. This is expected and correct.
Stabilizer timing matters. Too brief (under 30 seconds of contact) and the subsequent activator produces weak colour. Too long (over 3-4 minutes) and reactions overshoot into different effects. I typically work in the 1-2 minute range, watching for the yellow shift to stabilise before proceeding.
Step 6: Activator Application (Outdoors, Daylight)
I apply activator selectively with a brush, watching the print transform. Pale yellow areas shift toward amber, then bronze, then brown depending on activator concentration and contact time. Colour change occurs over 30-120 seconds—slower than the stabilizer effects, allowing time to observe and adjust.
This step offers artistic control. More activator on certain areas intensifies their colour. Areas receiving only stabilizer remain cooler (yellower). Working back and forth between stabilizer and activator applications lets me tune colour balance across the image.
The danger is overworking. Chemistry accumulates—you can always add more effect, but you cannot subtract. I've ruined prints by continuing too long, trying to intensify results that were already sufficient.
Step 7: Developer for Silvering (Optional, Outdoors)
For mirror-like metallic effects in specific areas, I introduce paper developer. A brush loaded with working-strength or diluted developer, applied to chosen areas, triggers silvering—the formation of continuous metallic films rather than discrete coloured particles.
I use this technique sparingly. Silvering is dramatic but can overwhelm the subtler colour effects. It works well for specific compositional accents—metallic highlights against coloured surrounds—but extensive silvering obscures the nanoparticle colours that make chromoskedasic distinctive.
Step 8: Rinse and Fix (Return to Darkroom or Shade)
When the print reaches a satisfactory state, I rinse thoroughly in running water (3-5 minutes) to halt reactions, then move to fixation. At the moment, I use standard fixer, but I've been considering for colour preservation to use the thiocyanate fix:
- 5% sodium thiocyanate solution: 1 part
- Water: 5 parts
- Treatment time: approximately 20 seconds with agitation
This removes residual silver halide without fully stripping the colour-forming particles. Standard fixer works but shifts colours toward grey—acceptable if you prefer more muted results or prioritise archival stability.
Step 9: Final Wash and Dry
Standard fiber-based print washing: 60-90 minutes in running water or equivalent archival wash sequence with water changes.
Dry prints face-up on screens. Do not squeegee—the altered surface marks easily.
Expect significant darkening on drying, roughly equivalent to one stop. If the wet print looks correct, the dry print will be too dark. Stop processing when the wet print appears somewhat lighter than your intended final result.
Image-by-Image: The DC Photographs
Let me walk through specific images and their responses to treatment.
The Escalator (Canopy Station)
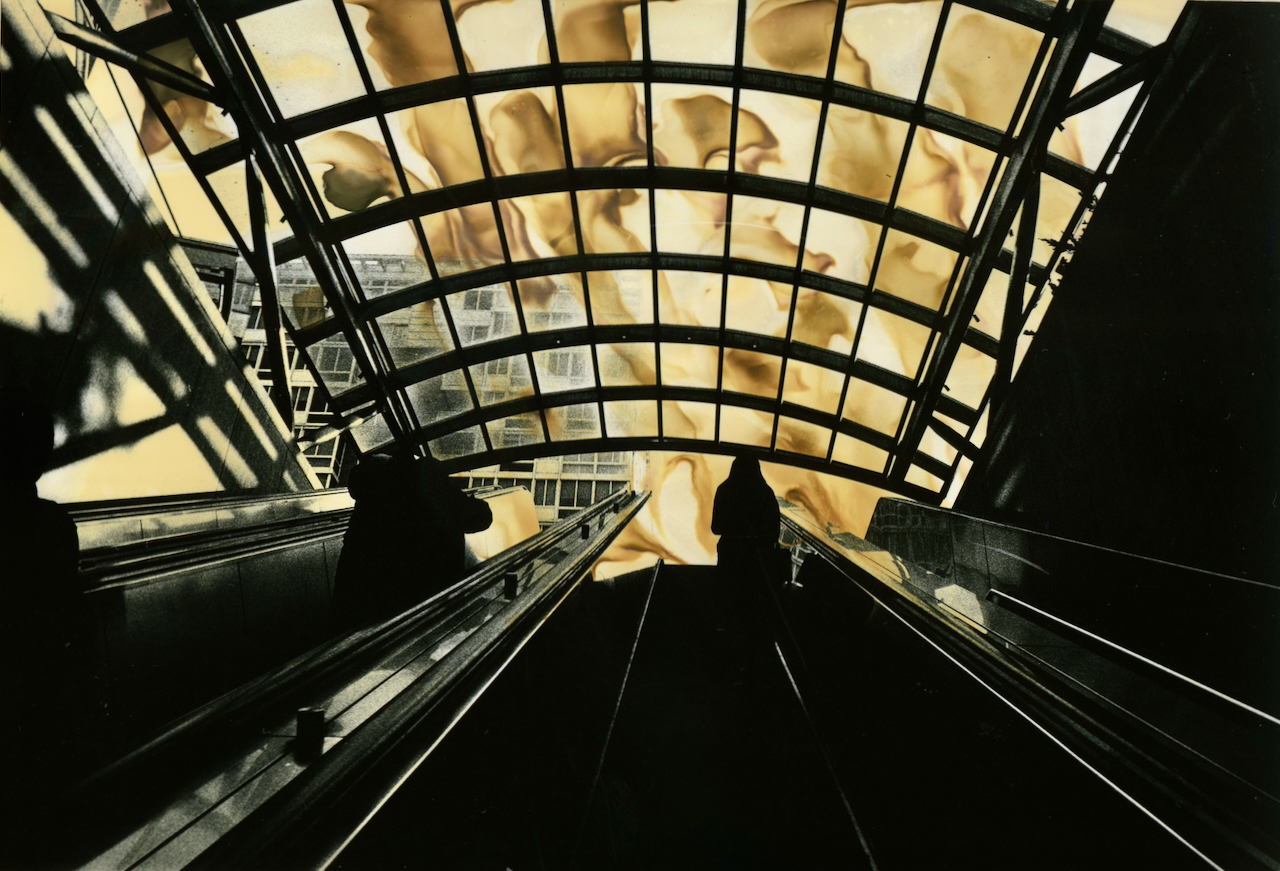
Shot looking up an escalator toward a glass canopy entrance, this image presents strong vanishing-point composition with the structural grid of the canopy filling the upper two-thirds of the frame. Silhouetted figures on the escalator provide human scale and narrative suggestion.
The canopy area, predominantly highlight (sky through glass), took colour dramatically. The structural grid of the canopy framework remained largely black, preserving contrast and compositional structure. The glass panels between grid members shifted to warm amber with areas of deeper bronze where activator concentrated during treatment.
What worked: The geometric regularity of the canopy grid meant uneven colour development reads as variation in light transmission through different panels—a natural interpretation rather than processing artifact. The warm tones suggest late afternoon sunlight through the structure.
What I might adjust: The colour gradient runs warmer at centre and cooler at edges, which is compositionally backwards—warmth drawing attention to edges would better frame the composition. More consistent activator application, or edge-weighted application, would improve future versions.
The Washington Monument
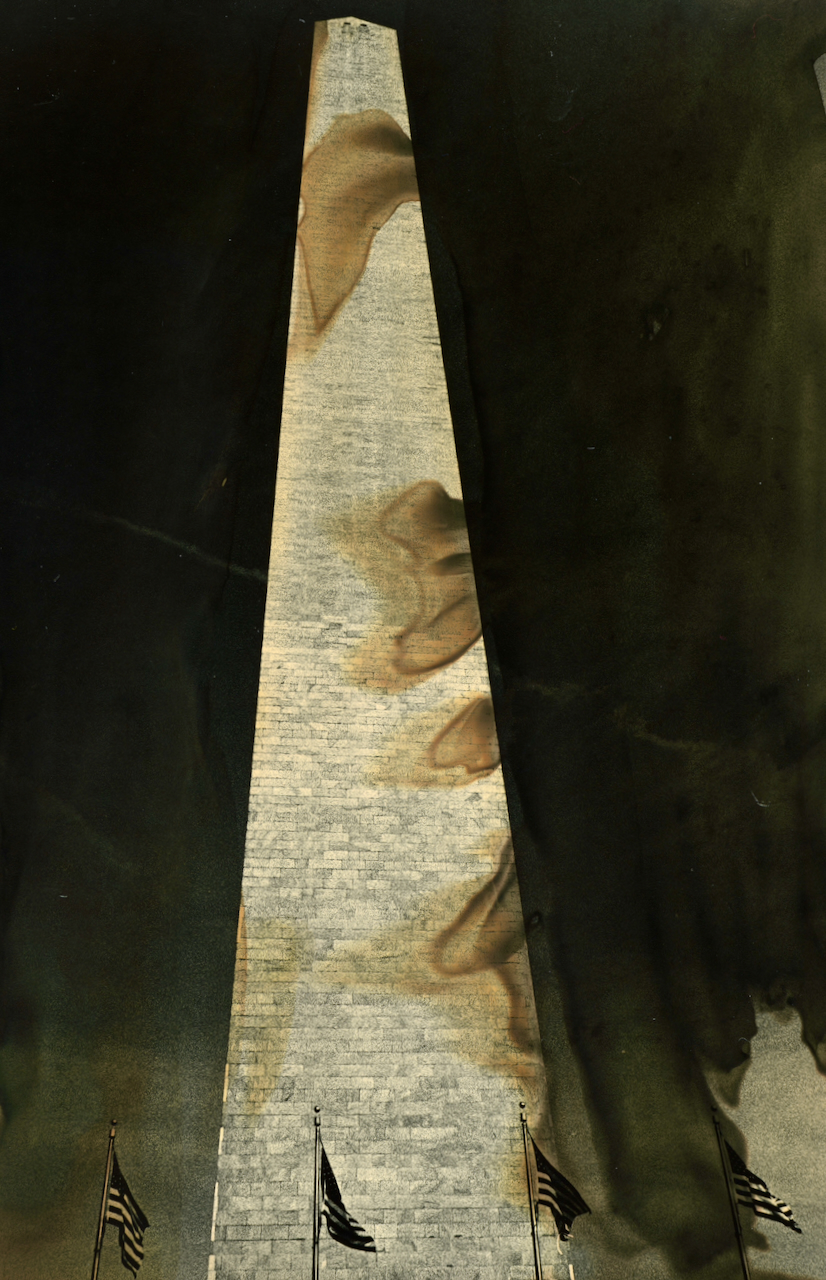
A simpler composition: the Monument filling most of the frame, shot from near its base looking upward, American flags on poles at the base. The marble shaft constitutes almost entirely highlight area against the bright sky.
This print demonstrates both potential and limitations when treating large continuous tonal areas. The Monument shaft developed rich bronze-amber colour, but with visible streaking where brush strokes deposited varying chemical amounts. The sky area, which I intended to push toward deeper amber, developed unevenly—some regions dark bronze, others remaining pale.
Conceptually, I find the print compelling despite (or because of) these technical imperfections. The Monument transformed from white marble icon to something resembling oxidized bronze or weathered metal. The streaking reads almost as weathering patterns on aged material. The American symbol rendered in tones of transformation and age carries meaning beyond the technical result.
What worked: The central concept—Monument as transformed, patinated, alchemically altered—succeeds. Bronze tones feel appropriate for monumental sculpture, creating associative resonance even though the actual Monument is white marble.
What I would adjust: More even chemistry application. The streaking, while interesting, wasn't intentional. Tray immersion rather than brush work would produce more uniform results on large continuous areas.
The Train
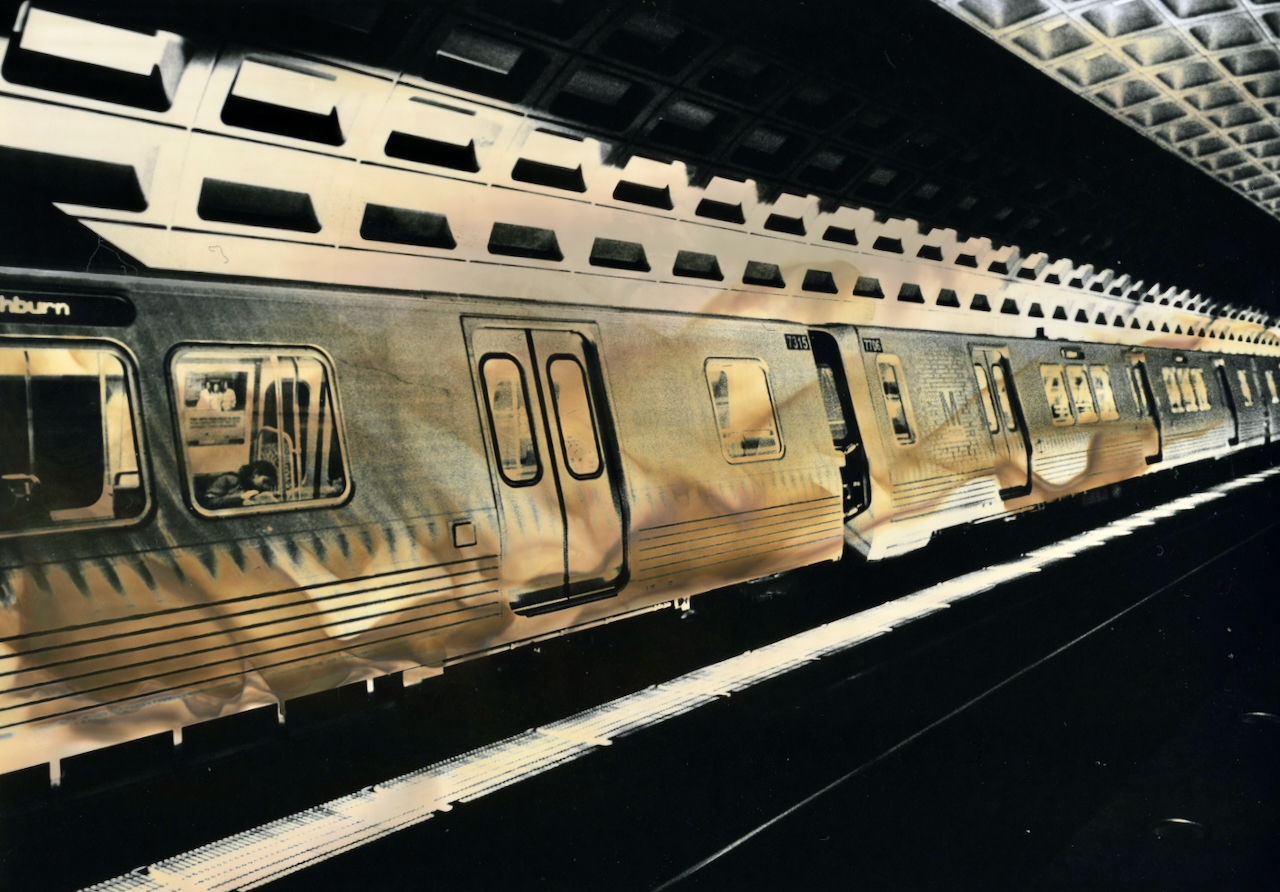
Metro train at platform, shot from an angle showing multiple cars receding. The 7000-series trains (introduced 2014-present) feature stainless steel exteriors that photograph as bright metallic surfaces—extensive highlight area in the negative. The platform and tunnel provide dark framing.
The train cars developed wonderful colour variation—each window reflecting differently, each panel taking chemistry at slightly different rates. The overall effect transforms the train from stainless steel to bronze, as though the vehicle were made of aged metal rather than modern industrial material.
What worked: Intentional combination of chromoskedasic colour (car bodies) created visual and material contrast. The composition holds together despite aggressive transformation.
What I would adjust: The tunnel ceiling visible in the background remained too yellow/grey compared to the bronze train. Extending activator treatment to background areas would create more unified colour.
Lessons Learned
After producing several dozen chromoskedasic prints, patterns have emerged:
On Image Selection
Geometric structure matters more than subject: Images with strong compositional bones survive aggressive colour transformation. Images relying on subtle tonal gradation become muddy and confused. Architecture, industrial subjects, and formal compositions work better than casual snapshots or organic subjects.
Significant highlight area is essential: Chromoskedasic colour forms in highlight regions. Images predominantly dark don't show effects clearly. Look for substantial bright areas—skies, illuminated surfaces, reflective materials—where transformation will be visible.
High contrast helps: Clear separation between shadows and highlights produces clearer results than middle-grey images where everything blends. The technique amplifies tonal distinctions rather than creating them.
Regularity tolerates variation: Repeating patterns (architectural grids, industrial repetition) accept uneven chemical effects because variations read as lighting differences. Unique forms show processing inconsistency more obviously.
On Chemistry
Fresh stabilizer, aged activator: Stabilizer works best fresh—thiocyanate concentration affects reaction efficiency. Activator works interestingly when aged—accumulated silver particles contribute to effects, particularly silvering. Save and reuse activator solution.
Temperature affects everything: I work at ambient outdoor temperature, which varies seasonally. Warmer days (summer) produce faster, more intense effects; cooler days (spring, autumn) require longer treatment times and produce subtler results. Consistency requires temperature awareness.
Activator is the danger zone: Over-application of activator pushes results past good colour into muddy brown. Apply less than you think necessary; observe results; add more only if needed. You can always intensify; you cannot reverse.
Brush quality matters: Cheap brushes shed bristles into chemistry and onto prints. Foam brushes provide broad coverage but lack precision. Quality calligraphy brushes hold fluid properly and allow controlled application. Invest in good tools.
On Process
Preparation prevents problems: Once stabilizer touches the print, you're committed. Have all materials ready before starting—chemistry mixed, brushes clean, rinse water available, working surface prepared. Scrambling mid-process causes errors.
Work at sustainable pace: The chemistry operates on minute timescales, not seconds. You have time to observe, think, and adjust. Rushing produces mistakes; patience produces control.
Document your process: Keep notes on exposure, development time, chemistry timing, ambient temperature. Results are difficult to reproduce exactly, but understanding what produced successes helps you work in productive ranges.
Accept imperfection: Chromoskedasic printing is inherently variable. Embrace the technique's aleatory quality rather than fighting it. Perfect reproducibility isn't achievable; interesting singular results are.
Make multiple prints: Given variability, producing several prints from one negative and treating them differently yields better results than attempting to perfect a single print. Variation is the medium's nature; work with it.
Combining with Other Techniques
The DC prints represent straightforward chromoskedasic Sabattier treatment. Future work might combine the technique with other processes I've explored:
Chromoskedasic + mordançage: Applying mordançage chemistry after chromoskedasic treatment—or interleaving the processes—might produce lifted emulsion effects with colour. The different chemical systems could interact in unpredictable ways.
Chromoskedasic + lith printing: Lith-developed prints, with their infectious development and distinctive tonality, might respond differently to chromoskedasic treatment than conventionally developed prints. The irregular silver structures of lith development could nucleate colour formation differently.
Chromoskedasic + kinetic enlarger movement: Applying enlarger movement during initial exposure (producing motion blur), then chromoskedasic treatment during printing, would layer motion effects with colour effects—two transformations on the same image.
These combinations enter genuinely unexplored territory. The DC work established baseline competence; subsequent experimentation will push into hybrid territory.
Resources for Practitioners
For those beginning chromoskedasic work, these resources proved valuable:
Christina Z. Anderson's materials: Her book The Experimental Darkroom (Routledge, 2022) provides the most comprehensive practical instruction available. Her articles through Freestyle Photographic Supplies remain accessible online.
Bridget Conn's workshops and handouts: Conn teaches chromoskedasic workshops and has developed excellent instructional materials covering both tray and brush methods.
Freestyle Photographic Supplies: They stock pre-mixed chromoskedasic chemistry and have historically supported the technique through educational materials.
Photrio forums: The Alternative Processes section occasionally features chromoskedasic discussion. The community is small but knowledgeable.
Start simple: Begin with tray method on small paper (5×7 or 8×10) to learn how your materials respond before attempting brush control on larger formats. Expect first attempts to fail instructively.
What These Prints Mean
Beyond technical process, what do these transformed images of Washington accomplish?
The photographs began as documentation—record shots of architecture, transit infrastructure, civic monuments. Standard black and white captures of public spaces. The chromoskedasic treatment pushed them elsewhere: documentary became decorative, record became interpretation, photograph approached painting or printmaking in its relationship to subject.
The warm tones suggest age, patina, the passage of time. The Washington Monument in bronze-amber evokes oxidized metal rather than white marble—the monument as archaeological artifact, aged object, thing-that-was rather than thing-that-is. The Metro stations, designed to feel futuristic, become almost Victorian in these prints—steam-punk transit, retrofuture infrastructure, spaces from some alternate timeline.
There's something appropriate about applying this alchemical process to images of the capital. Washington is a city built on transformation—political will converted into physical monument, abstract ideals made concrete in marble and granite and bronze. Chromoskedasic printing performs its own transformation, taking the silver-and-gelatin of photography and revealing unexpected colour through controlled chemistry. Both involve making materials speak in new registers through precise intervention.
Standing in the garden with chemistry and paper and afternoon light, watching amber tones develop across an image of the Monument, I'm participating in photography's long tradition of intervention—the recognition that the camera captures a beginning, not an end. What happens between negative and final print has always been where photography meets craft, where technical process becomes artistic choice.
Chromoskedasic Sabattier printing offers one path through that territory. It's demanding, unpredictable, and produces results impossible through any other means. For images that deserve transformation rather than mere reproduction, it offers something genuine: colour created from light and silver through physics alone, warm tones emerging from the structure of matter rather than the application of dyes.
References
Process and Technique
Anderson, Christina Z. The Experimental Darkroom: Contemporary Uses of Traditional Black & White Photographic Processes. New York: Routledge, 2022.
Anderson, Christina Z. “Quick and Easy Chromoskedasic Sabatier.” Freestyle Photographic Supplies. https://www.freestylephoto.biz/chromoskedasic-sabatier
Jolly, William L. Solarization Demystified. Buffalo, NY: William L. Jolly, 1997.
Lam, Dominic Man-Kit, and Bryant W. Rossiter. “Chromoskedasic Painting.” Scientific American 265, no. 5 (November 1991): 80-85.
Washington Metro Architecture
Schrag, Zachary M. The Great Society Subway: A History of the Washington Metro. Baltimore: Johns Hopkins University Press, 2006. [Comprehensive history of Metro planning, design, and construction.]
Weese, Harry, and Associates. Washington Metropolitan Area Transit Authority Design Manual. Washington, DC: WMATA, 1976. [Original design guidelines establishing the Metro's visual language.]
Forgey, Benjamin. “Metro at 25: How Architecture Transformed a City.” Washington Post, March 25, 2001.
Contemporary Chromoskedasic Practitioners
Conn, Bridget. Workshop materials and artist website. https://www.bridgetconnartstudio.net
Cook, Jan. “Fugue: A Dreamlike State” series. Analog Forever Magazine feature.
Whitehead, Ralph. “Making Rainbows from Silver.” Film Shooters Collective.
Related Technical Resources
Anchell, Stephen G. The Darkroom Cookbook. 4th ed. New York: Routledge, 2016. [General darkroom chemistry reference.]
James, Christopher. The Book of Alternative Photographic Processes. 3rd ed. Boston: Cengage Learning, 2015.
Online Communities
Photrio.com. Alternative Processes forum. https://www.photrio.com/forum/forums/alternative-processes.67/
AlternativePhotography.com. Process guides and community. https://www.alternativephotography.com